Physical Address
304 North Cardinal St.
Dorchester Center, MA 02124
Physical Address
304 North Cardinal St.
Dorchester Center, MA 02124

I’ve recently setup a Home Assistant server in my house, it’s great! It allows me to control various smart plugs, lights and security cameras in my house all from my phone. I really wanted to include a temperature and humidity monitor in every room, but home assistant compatible devices can be a little pricey! So after a little research I was convinced the XIAOMI Mijia 2 thermometer was the best option, mainly due to their low cost and large number of videos showing how to integrate them in Home Assistant. I decided to take the plunge and bought five from Aliexpress, check out this link for a real bargain:
XIAOMI Mijia Bluetooth-compatible Thermometer 2 Wireless Smart Electric LCD
🔗Click & Buy: https://s.click.aliexpress.com/e/_onsaLsF
After the thermometers arrived I immediately opened home assistant and waited patiently for them to appear in my Zigbee Home Assistant tab, yet they never did! Infuriated that I’d wasted my money I turned to the internet for help. Sorting posts by date on Reddit soon revealed that Xiaomi have only gone and changed the firmware on these devices (newest version is: 2.1.1.0159) which means it is no longer possible to update them over the air. The end result is that you need to use the official Xiaomi app to read the temperatures, this does have a home assistant integration, but who wants all their data uploading to the cloud just to know the temperature of their bedroom!?
I found a few posts and videos explaining the firmware can be changed over the air but you first need to extract the key (or something like a key) from the device, which still involves making an account etc. After a little more research I realized that it’s still possible to update these devices using the internal UART accessed within the device.
The first step in this process is to flash an older version of the firmware on to the device, to do this you’ll need a USB-to-UART adapter for your computer. The one I used can be purchased here:
USB to TTL Adapter USB to Serial Converter – Genuine FTDI USB UART IC FT232RL
🔗Click & Buy: https://s.click.aliexpress.com/e/_onMDXLv
You will also need a small screw driver kit, as the screws inside the device are not standard. Something like the set below show include all you need:
63 in 1 Magnetic Precision Screwdriver Set
🔗Click & Buy: https://s.click.aliexpress.com/e/_ophNwJd

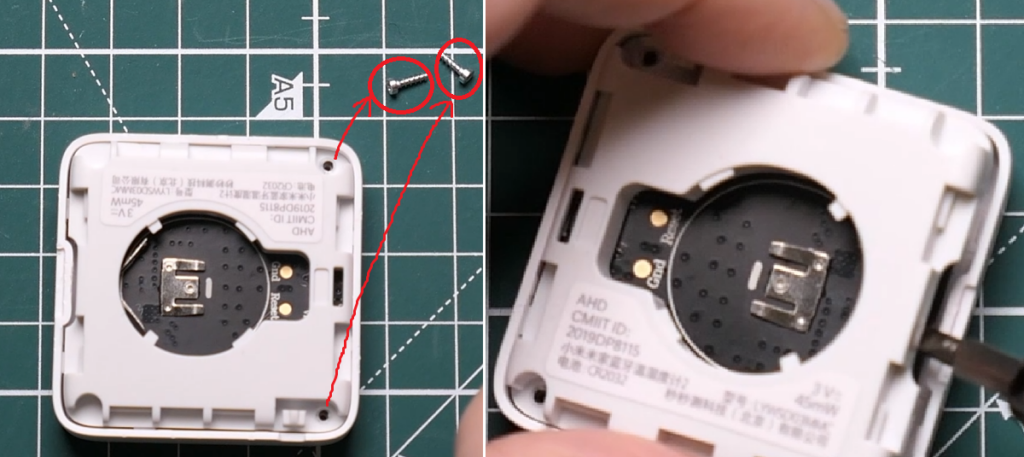
Once you have the right tools, you’ll need to open the unit. This is relatively straightforward, but can be a little nerve-wracking the first time you do it. Start by removing the back cover and taking out the battery.

Next you need to remove the two tiny little screws and then prize the back cover off by gently using the flat side of a screwdriver to gradually lift it up, start where there’s a little gap between the back plate and side wall.

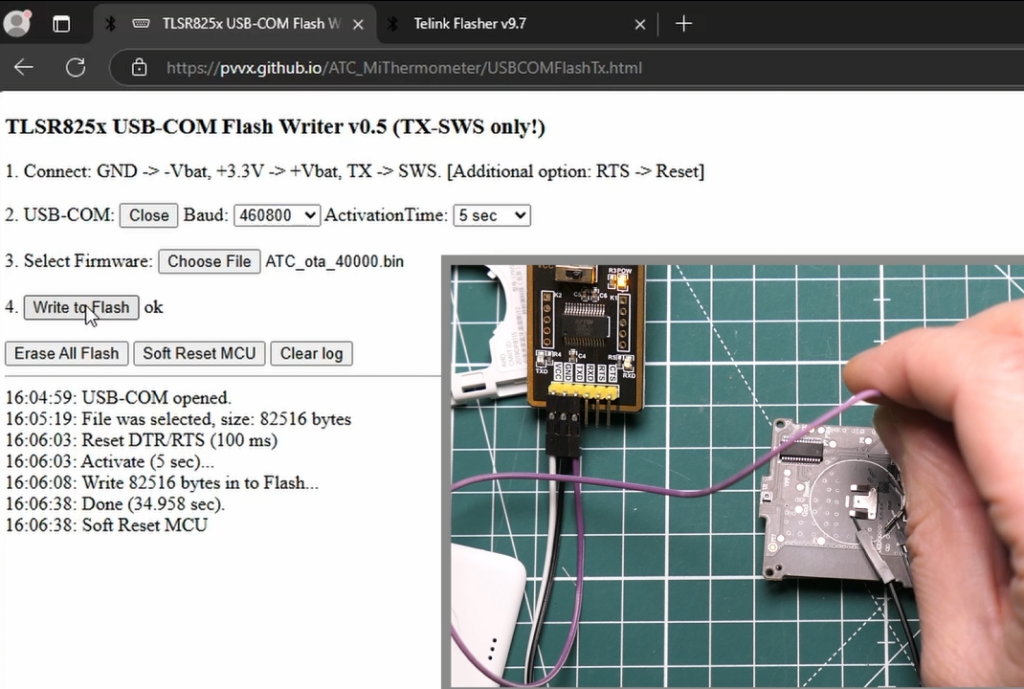
Once the back plate has been removed you can carefully remove the PCB. The ground wire from your USB-UART board goes to the central battery tab in the middle of the board, the 3.3V from you board goes to the triangle shaped metal tab that contacts with the side of the battery, and finally the Tx from your UART board goes to test point P14 on the PCB:

The next step is to flash a new firmware on to the device, this will allow a hacked firmware to be uploaded via Bluetooth in the next step.
First download the linked ATC_ota_40000.bin firmware file, then navigate to the following web address:
https://pvvx.github.io/ATC_MiThermometer/USBCOMFlashTx.html
Note, the flashing tool only works in certain browsers, it WORKS in Edge, but it DOESN’T WORK in Firefox!

Once the come port is open, press the ‘Choose File’ button and select the ATC-ota-40000.bin file.
The final step is to hold the wire from the Tx pin on USB-UART board to the pin P14 on the PCB and press the ‘Write to Flash’ button. You will see the new firmware being uploaded, it takes about 40 seconds. During this time you must keep the wire held against pad P14!

Re-assemble your device and you should see that it operates in exactly the same way it did previously.
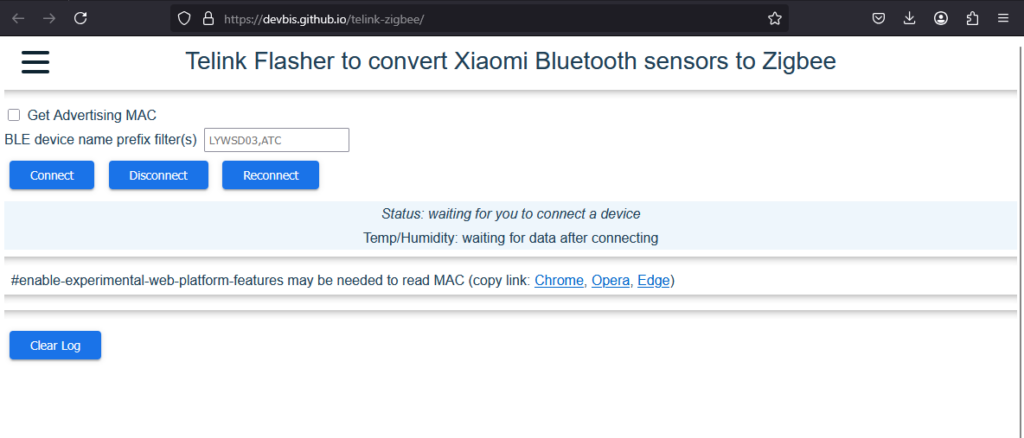
The next step is to connect to the unit and flash a hacked firmware that turns the Zigbee transceiver on. This is much easier than step 3 as it is all done via a webpage and doesn’t require the unit to be opened.
Download the Z03mmc03.bin file and navigate to the following page:
https://devbis.github.io/telink-zigbee

Click connect and wait (for up to 5 minutes) for the thermometer to appear, it’ll have a name begging ATC-

Once paired, simply click the ‘Choose File’ button and select the Z03mmc.bin file, then press the ‘Start Flashing’ button. This takes at least 2 minutes to complete.
Once you have installed the new firmware, you can go into Home Assistant and search for a new Zigbee device, again this takes some time, but after a few minutes the thermometer should be detected and you simply need to rename it and place it in the appropriate area!

This post shows you how to change the latest and locked-down firmware on a Xiaomi Mijia 2 thermometer. It’s not as easy as it used to be, but with a few simple tools it is possible to unlock these devices, integrating them with Home Assistance for reliable and low cost temperature and humidity measurement with a battery life of many months (maybe even a year!).