Physical Address
304 North Cardinal St.
Dorchester Center, MA 02124
Physical Address
304 North Cardinal St.
Dorchester Center, MA 02124

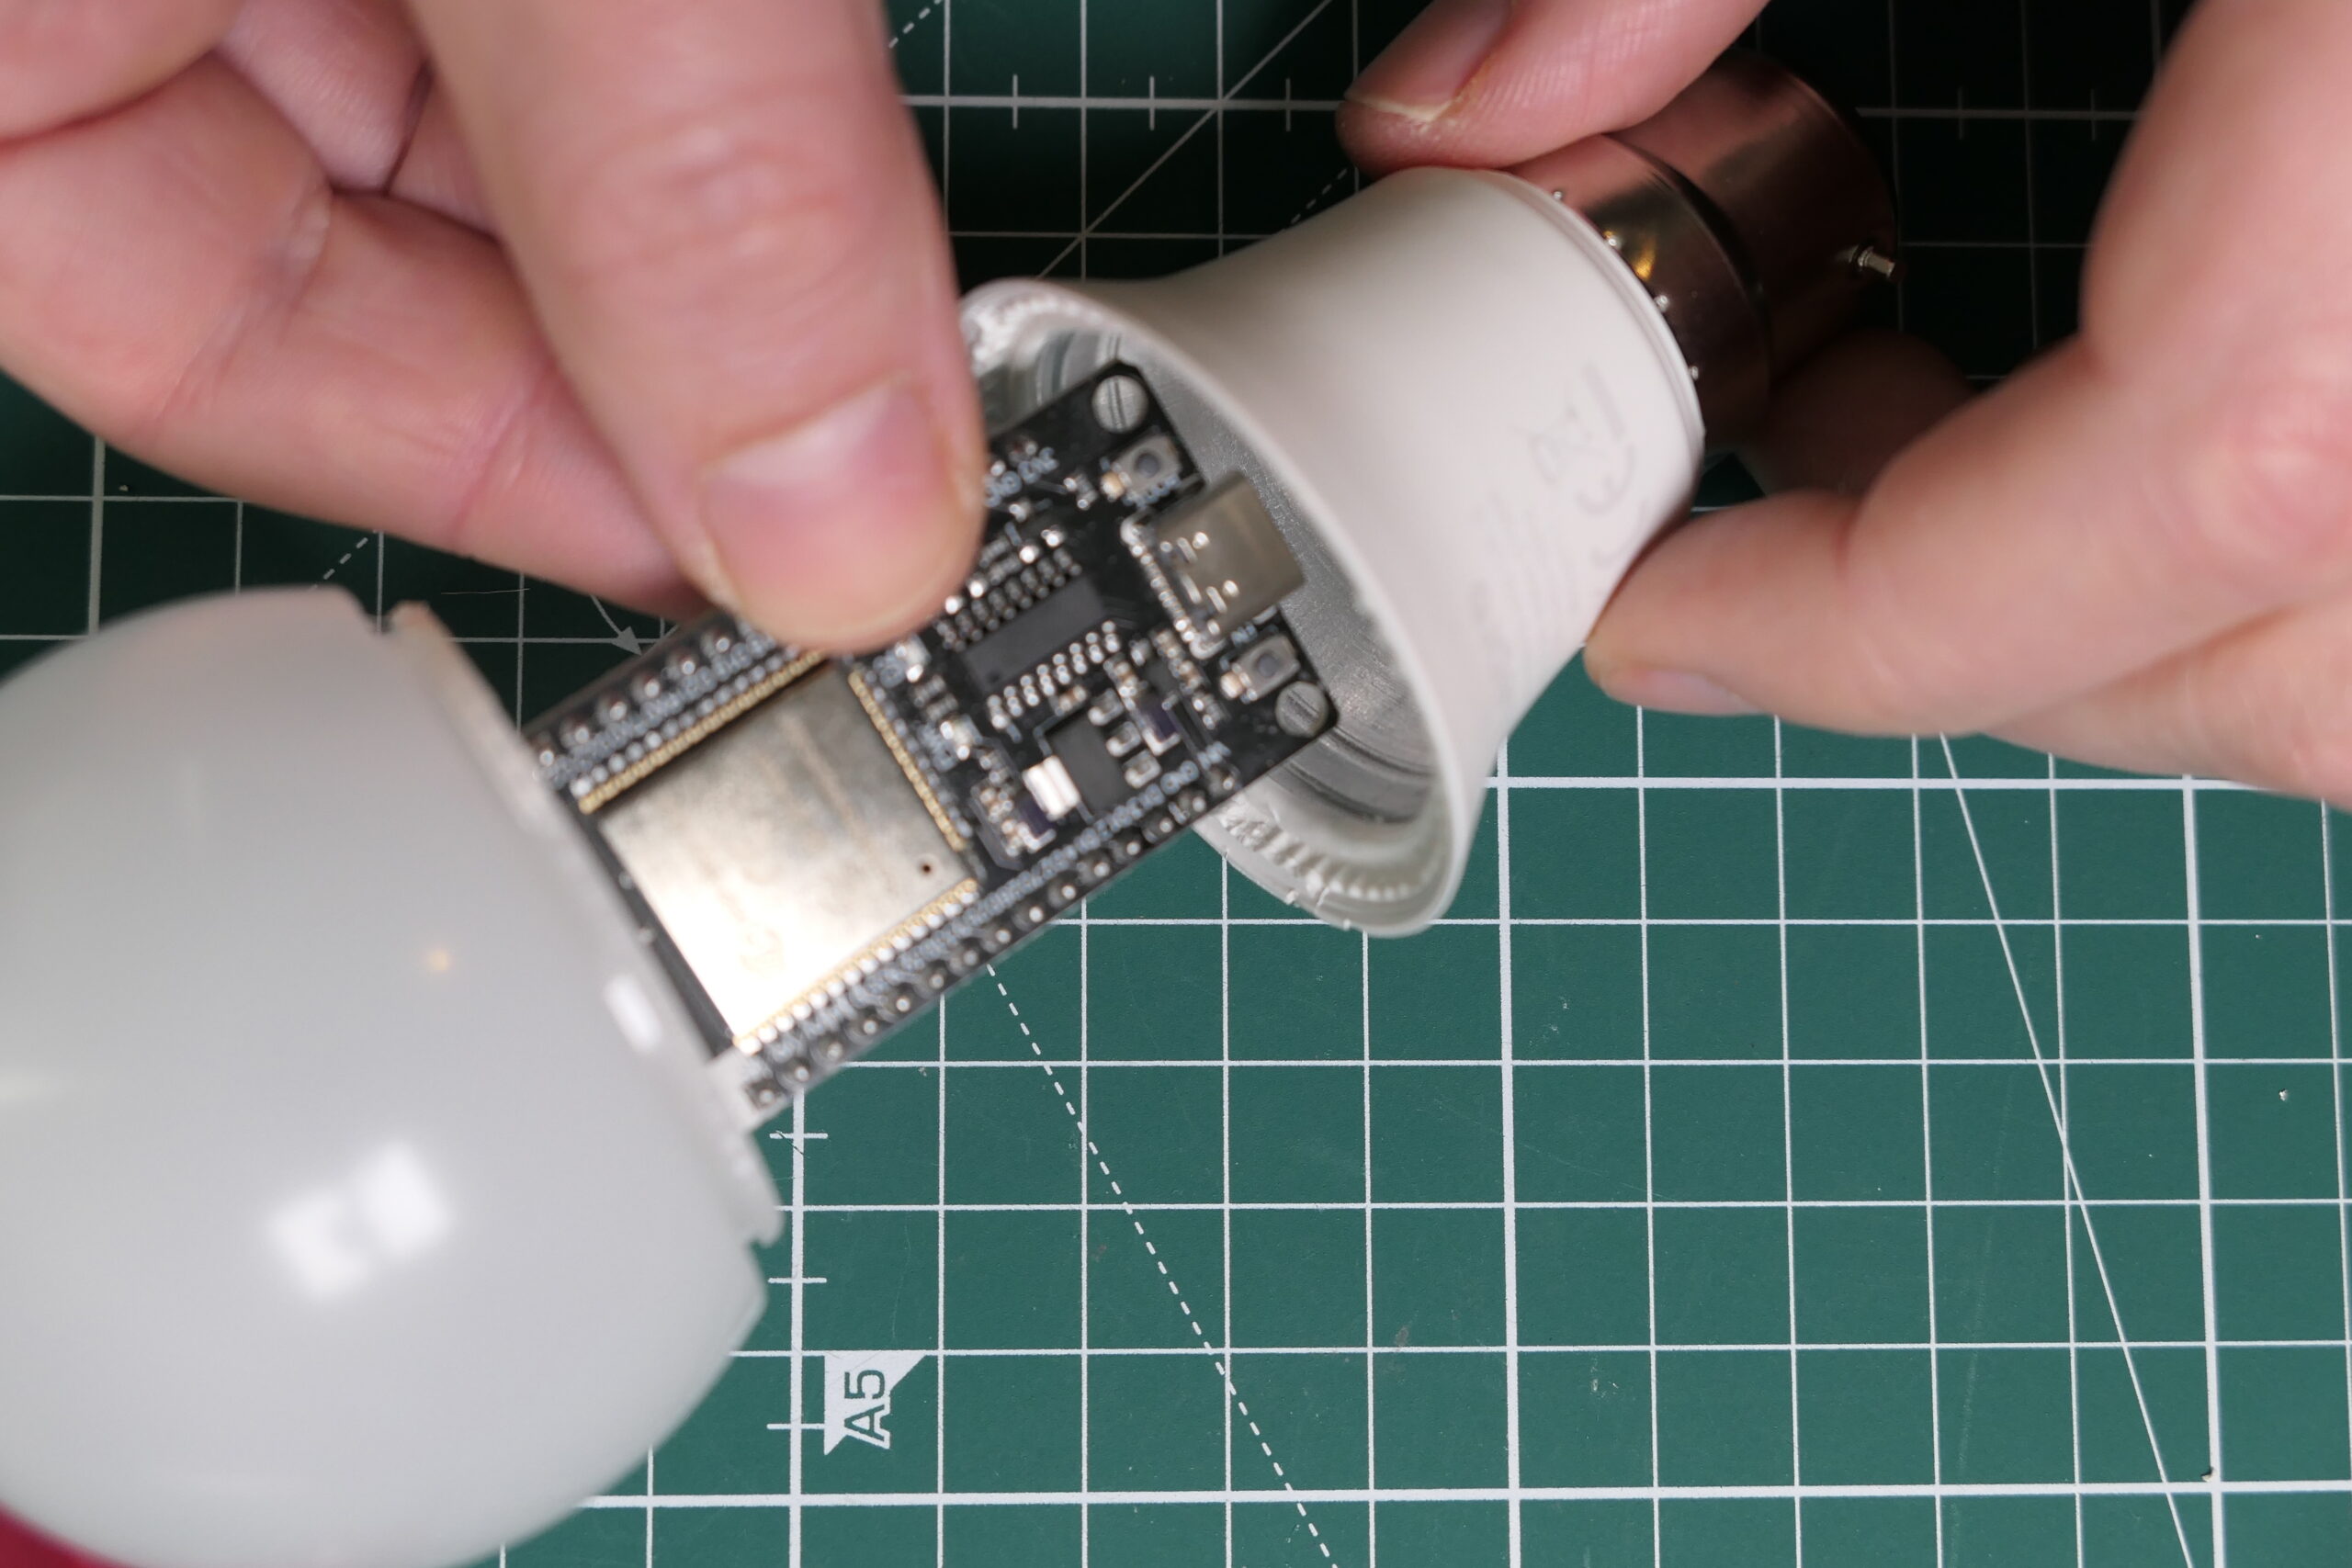
In this post we’ll explore how to setup an ESP 32 microcontroller as a WiFi FTP file server. This builds on my recent video which shows how to integrate the ESP32 into a light bulb to keep it secret! This is a relatively straightforward project that almost anyone can do, just be aware that installing it in a light bulb involves the use of mains electricity which can be dangerous, so if you’re inexperienced I suggest to power the project using USB!
Before we jump in, let’s look at the equipment needed and where to get it:
An ESP32 development board, I used the ESP32 Dev Board ESP32-WROOM (USB C version used in the video), it has over 10k sales and a 4.8/5 rating on Ali Express.
A Isolated AC-DC convertor, takes the 240 VAC mains down to 5 VDC, I used the Hi-Link HLK-5M05 (5 V, 1 A, 5W version), but the 2W version would probably be fine and is easier to fit in the bulb!
A USB cable, I used an ESP32 with a USB C port, so needed a USB-C to USB-C cable, you may need something else depending on your computer/ESP.
A large light bulb to hide the ESP32 and power supply, my ceiling light has a B22 socket, you made need something different, E27 is also quite common.
A computer for programming the ESP32 with Arduino IDE installed (also works with PlatformIO).
The first step is to plug your ESP32 into the computer, you should hear a sound if it has been recognized correctly.
In Arduino IDE, select the board manager (ctrl-shift-B) and search for DOIT ESP32 DevKit V1 (assuming you have a similar dev board to the one I’m using).

I like to test all is well by uploading an example sketch, the AnalogRead.INO example is great for this, it simply sends serial data out to show your ESP32 is behaving as expected:

To keep things simple, we’ll use the excellent ESP32FTPServer library by Henrik Ste. It’s not built into the Arduino IDE, so we need to manually install it.
Note: the ESP32FTPServer is a really good library, but, it is designed to work with the ESP32 acting as a client on your existing WiFi network, in other words the ESP32 will join your home network and act as an FTP server on it. The library won’t let the ESP32 act as an access point without some modification (which I’ll describe later).
To get the most out of an FTP server it needs to have a decent amount of storage, here the use of an SD card comes to our rescue! SD cards are able to communicate via the SPI (the Serial Peripheral Interface) bus. This uses four wires for communications:
MISO: Master In Slave Out
MOSI: Master Out Slave In
SCK: Serial Clock
CS /SS: Chip Select
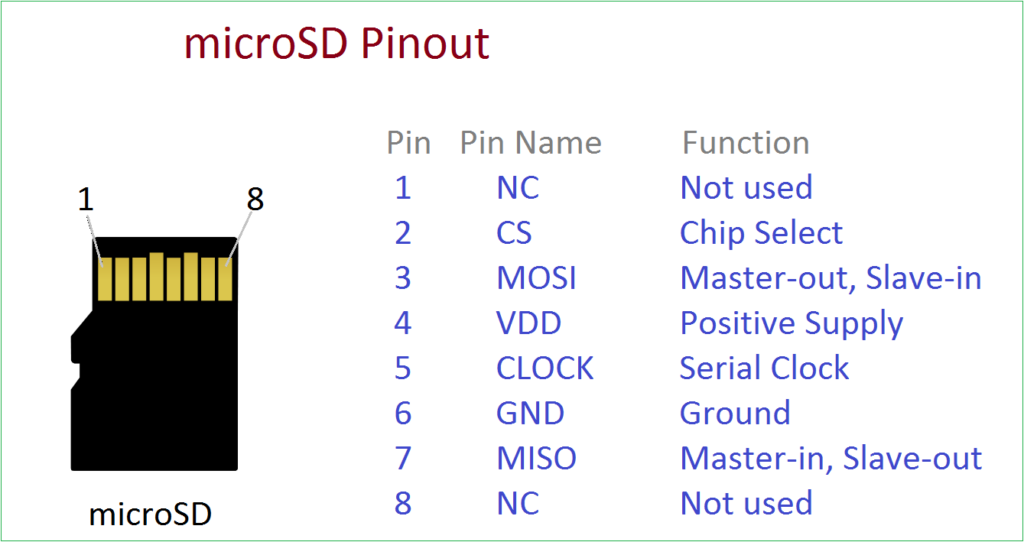
Looking at the pin description of an SD card you can see these pins:

The ESP32 also has the necessary SPI pins (just be careful as they may be different on different Dev boards), the CS pin isn’t fixed and is set in software. Here’s the wiring diagram needed to connect the SD card directly to the ESP-WROOM-32 Dev Kit:

Credit to Alex Lubbock for the diagram.
There are SD card modules available for to enable ESP32 / Arduino to interface with SD cards, they make life easier but… almost every micro-SD card comes with an adapter so it can be read by computers that only have full-sized SD card readers. It’s possible to use this directly, just be careful not to leave the soldering iron on the pins too long, as the plastic surround quickly melts, as you can see below!

To check everything is working well, the following code can be uploaded to the ESP32:
#include <WiFi.h>
#include "ESP32FtpServer.h"

const char* ssid = "Your AP SSID";
const char* password = "Your AP password";

FtpServer ftpSrv;

// SD card options
#define SD_CS 5

void setup(void) {
  Serial.begin(115200);

  WiFi.begin(ssid, password);

  pinMode(9, INPUT_PULLUP);

  // Wait for connection
  while (WiFi.status() != WL_CONNECTED) {
    delay(500);
    Serial.print(".");
  }
  Serial.println("");
  Serial.print("Connected to ");
  Serial.println(ssid);
  Serial.print("IP address: ");
  Serial.println(WiFi.localIP());

  //FTP Setup, ensure SD is started before ftp;
  if (SD.begin(SD_CS)) {
    Serial.println("SD opened!");
    //username, password for ftp.  set ports in ESP32FtpServer.h  (default 21, 50009 for PASV)
    ftpSrv.begin("esp32", "esp32");
  } else {
    Serial.println("SD open failed!");
  }
}

void loop(void) {
  ftpSrv.handleFTP();
}
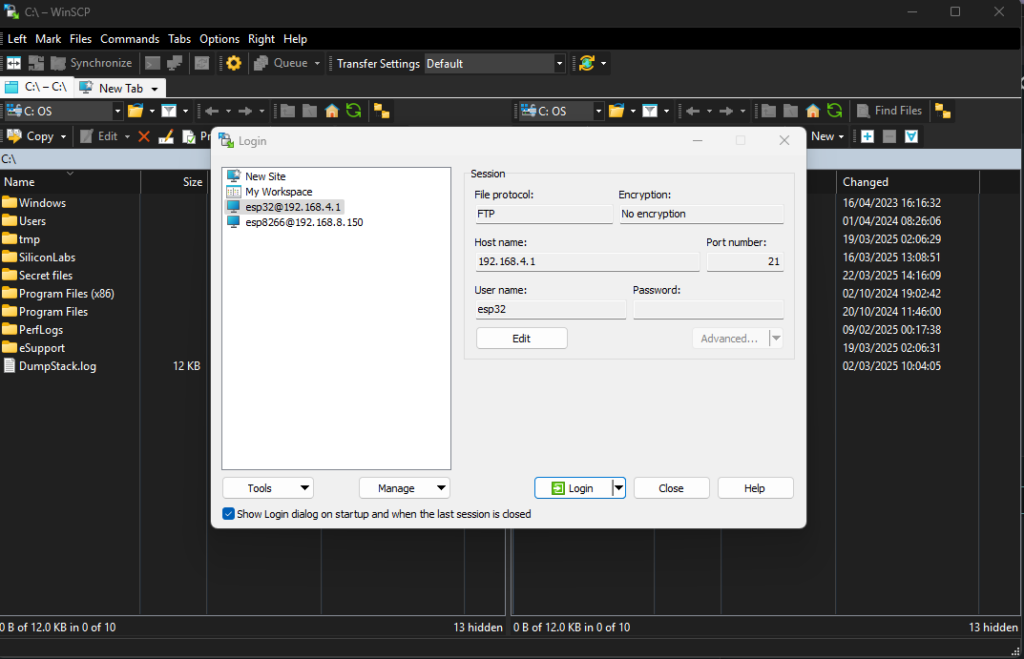
If all goes to plan, you should see the IP address of your ESP32 in the serial terminal. You can then use an FTP client (or even a web browser) to access the files on the SD card), I use WinSCP it’s free and very user friendly:

If everything is working you’ll see the files on your PC on the left hand side, with the panel on the right showing the files stored on the SD card connected to your ESP32. You can simply drag and drop files to upload/download to/from your computer and the ESP32:
This next step is optional, but it doesn’t seem very secure to have your FTP server connected to the same network everyone in your house is using! It would be much better to have a private network that only you can access. Unfortunately, the ESP32FtpServer library is not compatible with this, so we need to make some tweaks!
The actual changes go a little beyond the scope of this blog but you can simply download the ESP32FtpServer.h and ESP32FtpServer.cpp files and use them to replace the existing ones in your library folder (don’t forget to restart). Also, the modified library will no longer allow your ESP32 to join your home network, so take a backup of the existing files in case you want to go back!
Once you’ve replaced the libraries, use the following example code to create an Access Point named My_ESP32_AP with a password of pasword123, it will also create an FTP server on port 21:
#include <WiFi.h>
#include "ESP32FtpServer.h"

const char* apSSID     = "My_ESP32_AP";    // Change to your preferred SSID
const char* apPassword = "password123";      // Change to your preferred password

FtpServer ftpSrv;

// SD card chip select pin
#define SD_CS 5

void setup(void) {
  Serial.begin(115200);

  // Set up the ESP32 as an Access Point
  WiFi.softAP(apSSID, apPassword);
  Serial.println("Access Point started");
  Serial.print("AP IP address: ");
  Serial.println(WiFi.softAPIP());

  pinMode(19, INPUT_PULLUP);

  // Initialize the SD card before starting the FTP server
  if (SD.begin(SD_CS)) {
    Serial.println("SD opened!");
    // Start the FTP server with username and password ("esp32", "esp32")
    ftpSrv.begin("esp32", "esp32");
  } else {
    Serial.println("SD open failed!");
  }
}

void loop(void) {
  ftpSrv.handleFTP();
}
While it’s great having your own private WiFi Access Point, it’s not so great that everyone in your local area can see it! A new SSID that suddenly appears might raise a few eyebrows and attract unwanted attention… so to overcome this, it’s possible to stop the SSID being broadcast, don’t worry though, as long as you know the name it’s still possible to connect to it! Try the code below:
#include <WiFi.h>
#include "ESP32FtpServer.h"

const char* apSSID     = "My_ESP32_AP";    // Your desired SSID
const char* apPassword = "password123";      // Your desired password

FtpServer ftpSrv;

// SD card chip select pin
#define SD_CS 5

void setup(void) {
  Serial.begin(115200);

  // Set up the ESP32 as a hidden Access Point:
  // Using channel 1, hidden (true), and allowing up to 4 clients.
  WiFi.softAP(apSSID, apPassword, 1, true, 4);

  Serial.println("Access Point started (hidden)");
  Serial.print("AP IP address: ");
  Serial.println(WiFi.softAPIP());

  pinMode(19, INPUT_PULLUP);

  // Initialize the SD card before starting the FTP server
  if (SD.begin(SD_CS)) {
    Serial.println("SD opened!");
    ftpSrv.begin("esp32", "esp32");
  } else {
    Serial.println("SD open failed!");
  }
}

void loop(void) {
  ftpSrv.handleFTP();
}
So in this fun little project we saw how to turn an ESP32 into a powerful wireless web-server. Using an SD card gives masses of storage and turning the ESP into a hidden WiFi access point provides a sneaky way to hide important files yet still maintains an easy way to access them! I hope you found it useful and let me know if you have any comments or feedback on [email protected]
Comments are closed.
Impressive, thank you for the effort and advice, that is right what I am looking for!!
Thanks! Also thanks for taking the time to write a comment, it’s the first I’ve ever had on my blog!!
Sorry to let you know that library https://circuithelper.com/esp32-ftp-server/#:~:text=Download%20the-,FTP%20server%20library,-from%20GitHub. is not working, the Esp32FtpServer.h is not included in the download, if you can share it, would be great.
That’s weird, it looks to be there and accessible on my Git page? I’ll try from a different computer tomorrow to be sure!
You are definitely going in the right direction with this project.