Physical Address
304 North Cardinal St.
Dorchester Center, MA 02124
Physical Address
304 North Cardinal St.
Dorchester Center, MA 02124

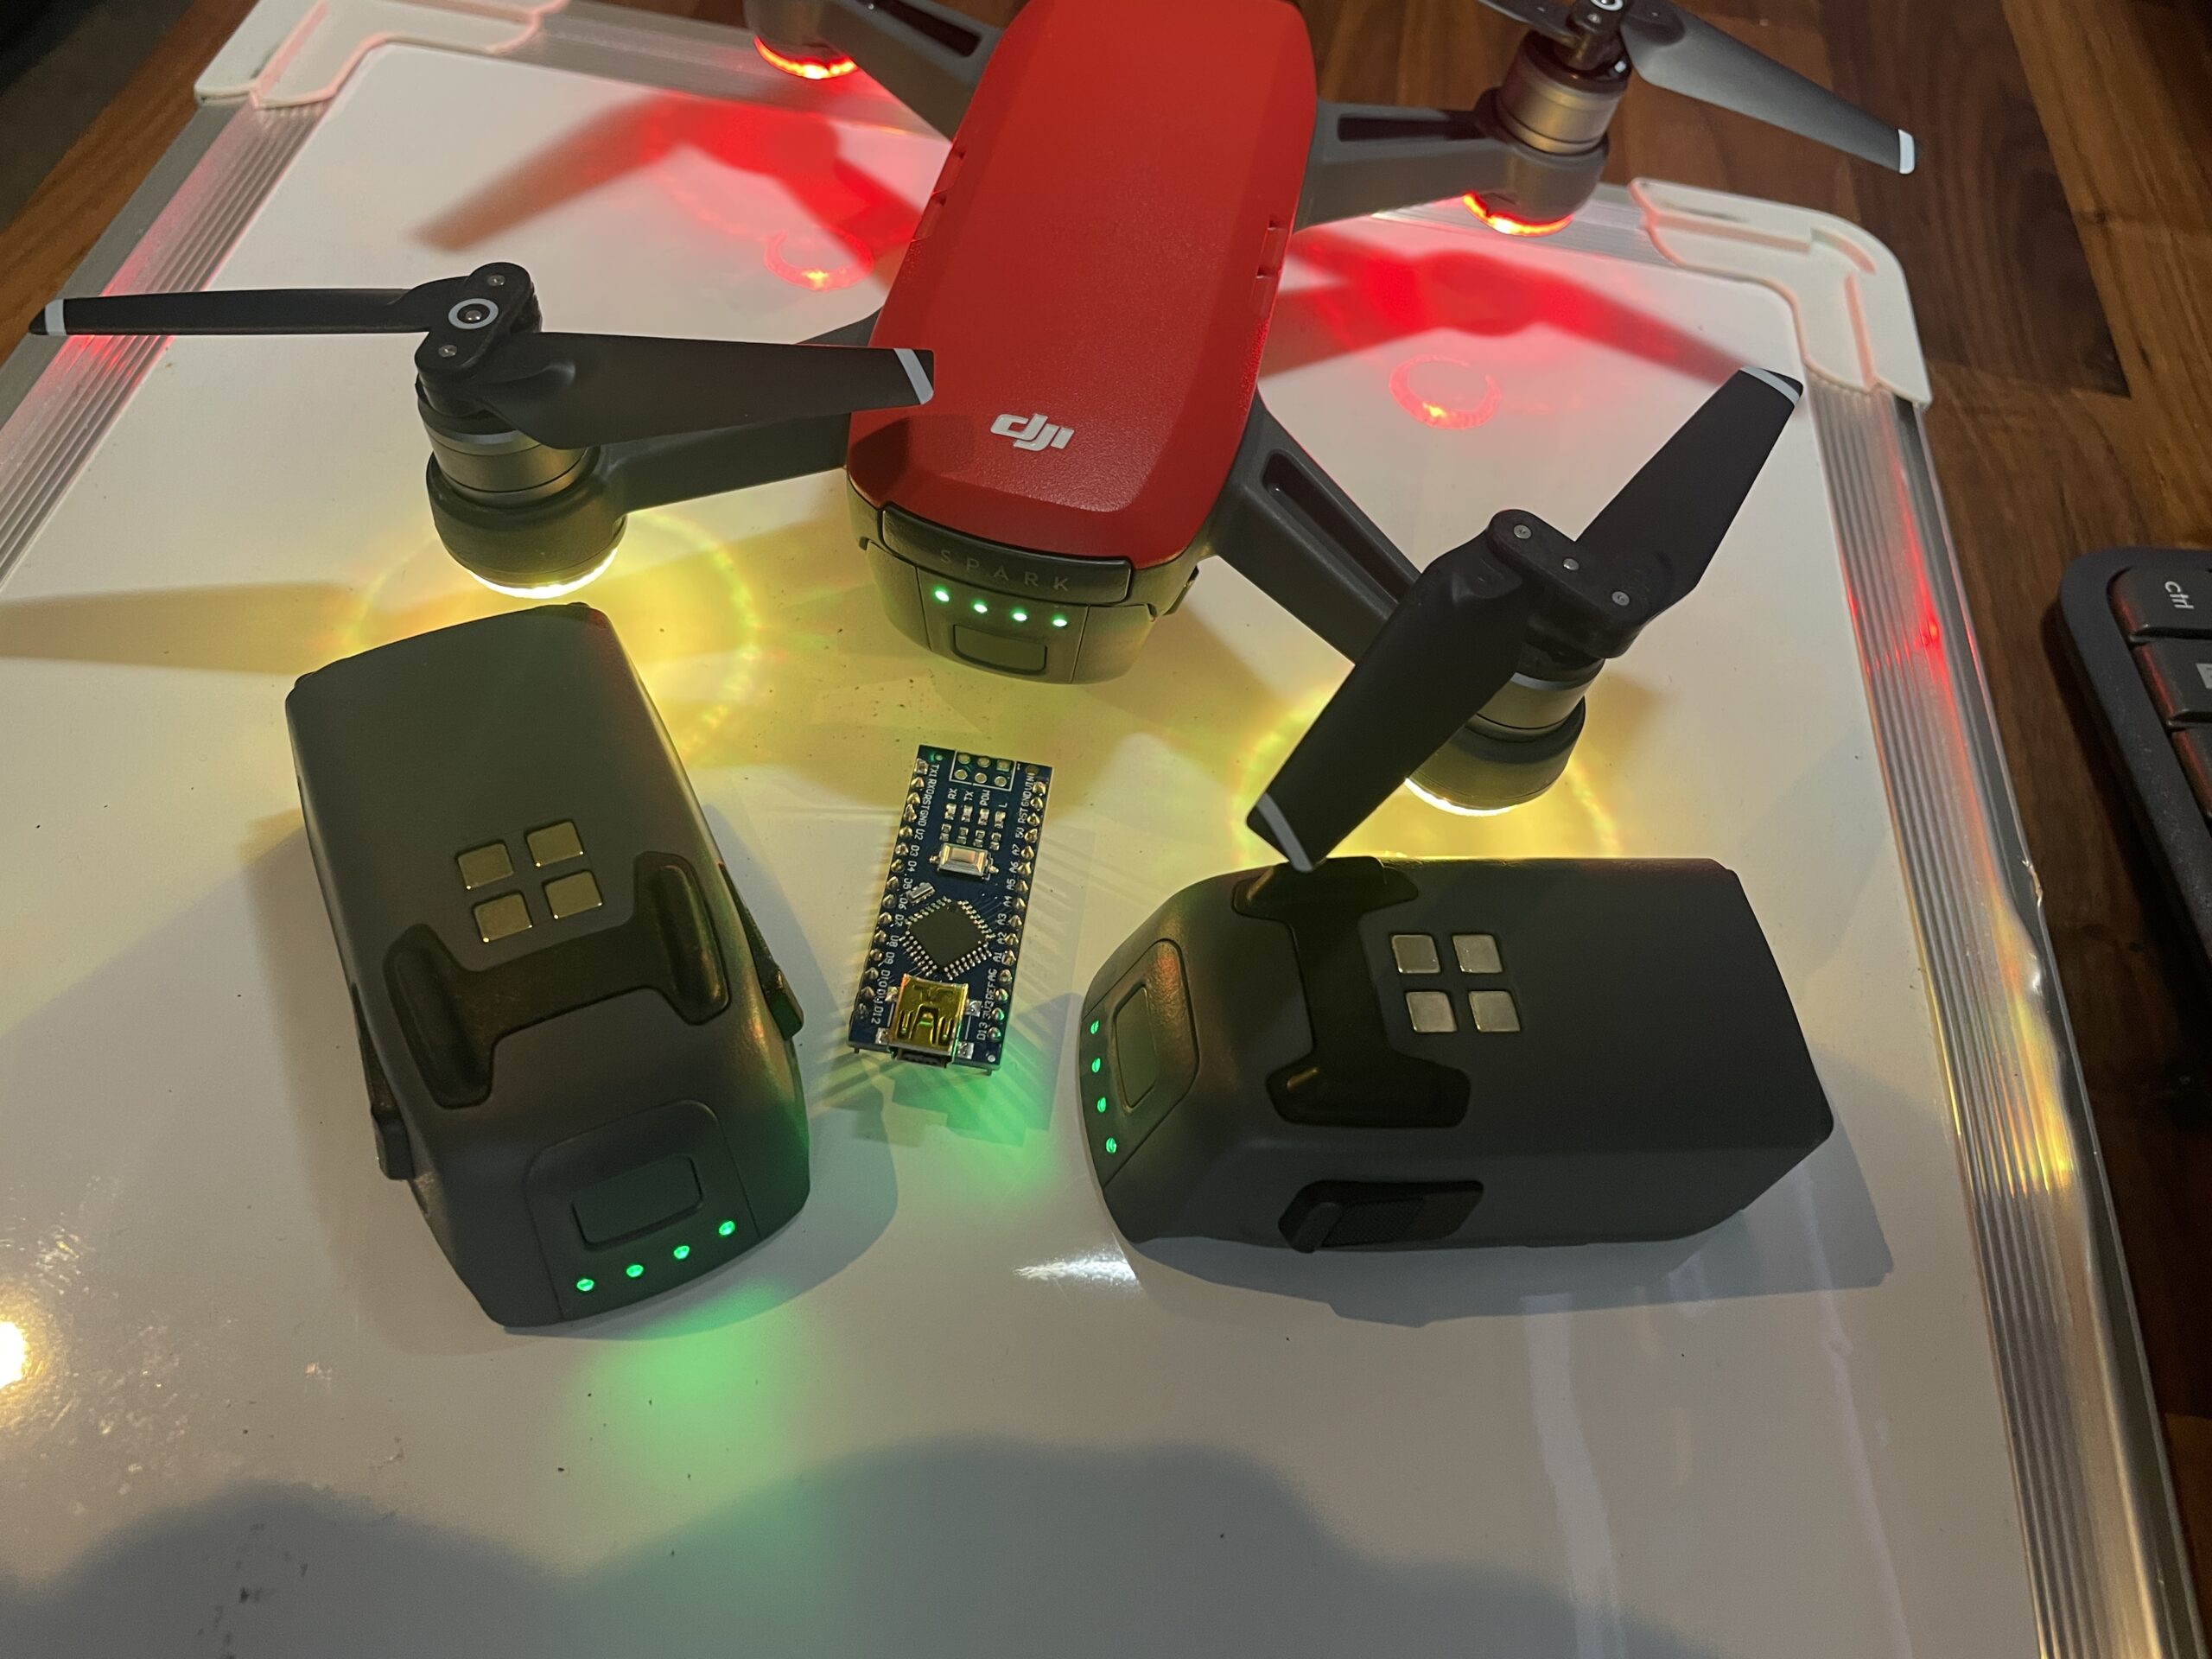
So a few months ago I dusted off my trusty DJI Spark that had not been used in many years (maybe 5+), I installed one of the three batteries I have and got ready for take off. When trying to power up the drone, I was outraged to discover that the batteries (all of them) were totally dead, pressing the battery test button showed no lights. I attempted to charge them several ways, either in the official DJI multi-charger or in the drone, nothing worked!
After a little online research I discovered the battery controller is designed to recognize that the voltage on the cells has dropped to a critical level and then locks the battery, preventing it from ever being charged again – ridiculous!
I checked a few YouTube videos on how to repair dead DJi batteries and found thousands using a CP2112 USB-I2C converter board, they only cost a few bucks so I bought one… it didn’t work, it wasn’t even recognized by my computer, so I bought another from a different supplier. Surprise, surprise, the second board didn’t work either.
Once I realized the drone battery simply uses an I2C controller IC, I set about coding an Arduino program to unlock it. However, after a little more research I found somebody had already written the necessary code, winner winner!
In this post I’m going to outline the steps you need to take to unlock DJI drone batteries, for sure it works for the Spark and Mavic, but I suspect it might work for all those with an I2C controller chip.
(1) The main thing you need is an Arduino Nano, an Uno will also work but you need to use the correct pins. I used a clone Nano as they are really cheap and I have several sat in a drawer doing nothing. If you want to pick up the same one I used you can get it here:
USB Nano 3.0 With the bootloader compatible Nano controller for arduino CH340 USB driver 16Mhz ATMEGA328P
https://s.click.aliexpress.com/e/_oDsVvzD
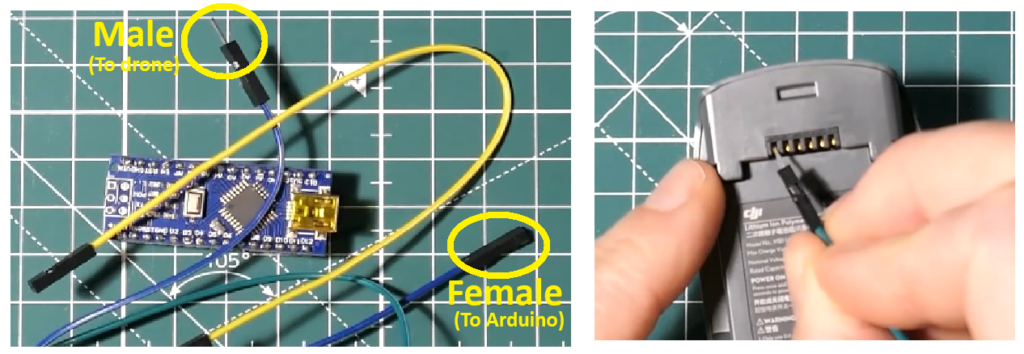
(2) You will also need some connecting wires, in particular those with female (for the Arduino pin header) and male (for the DJI pads) connectors. Something likes these should do it:
https://s.click.aliexpress.com/e/_ooyoky3
(3) You need to download two things in order to successfully unlock the battery, the first is freely available and is called xLoader, it allows you to upload binary files on to the Arduino. The second file, PFReset.hex was originally free to download from a site called CircuitSchools; however, they are now charging $5 to download it 🙁 I’m all for supporting the original author, but if you’re struggling to get the file then send me an email and I will see if I can help you out.
The first step it to use the xLoader software to upload the PFreset.hex file on to the Arduino. Simply connect your Arduino to your computer using a USB cable. It should be automatically recognized. To check if it is, you can go into the Arduino IDE and upload an example program, this should tell you what COM port it is connected to. Once you are sure the Arduino is properly connected and you know which port it is on, open xLoader and select the following options:

Once all the setting are correct, press the upload button. It should only take a few seconds and the uploaded bytes should be 4846. Now you should disconnect your Arduino from your computer and move on to step 2.
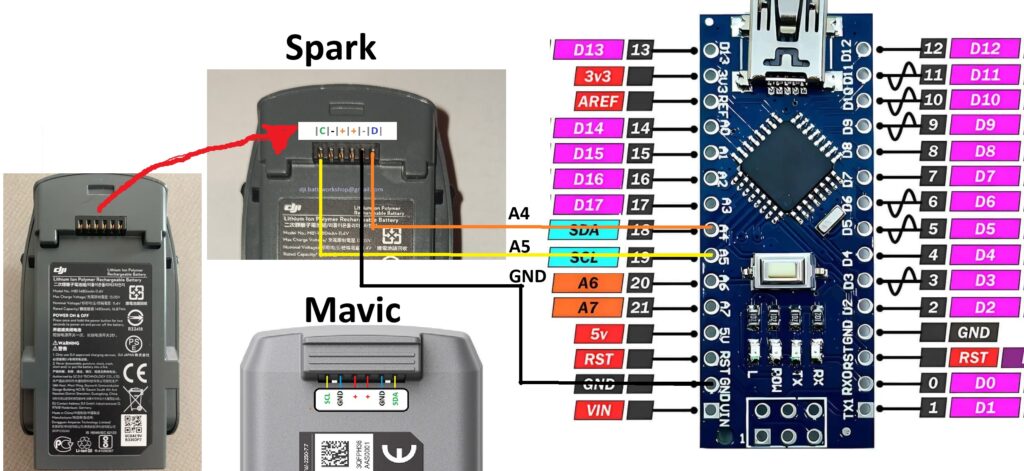
If your battery still has a tiny amount of charge in it, then you may only need to use three wires. Connect them as shown in the diagram below:

This can be done by simply wedging the male connector into the terminal on the DJI battery, as shown below:

Ensure the following pins are connected:
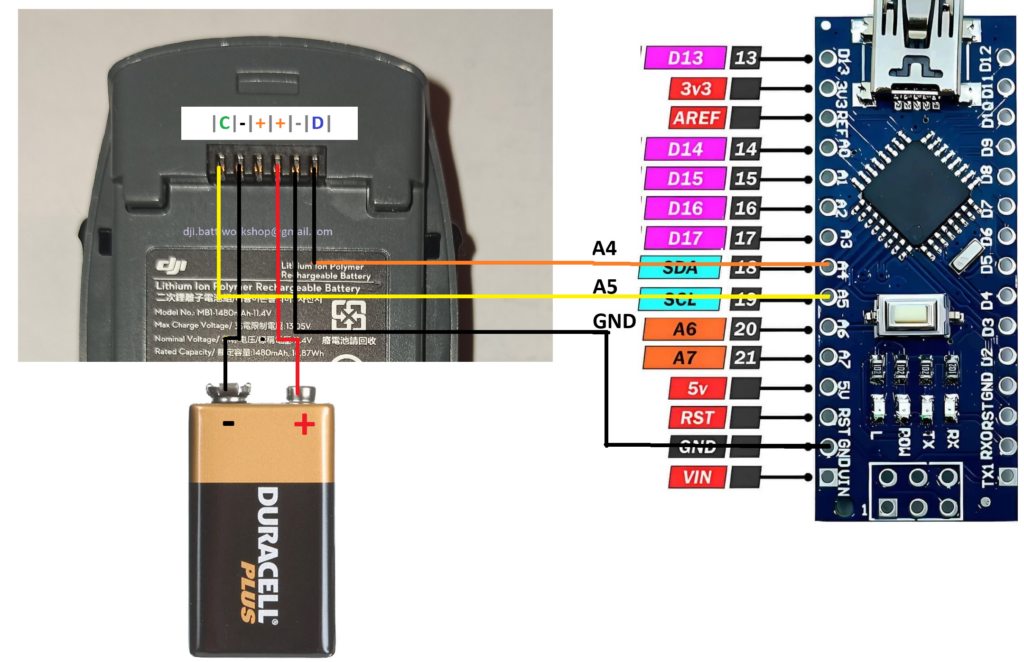
If your battery is completely dead, you may need to provide an external voltage source. I used a 9V PP3 battery, this was fine for the Spark. Apparently, other drone batteries (e.g. Mavic and Mini) may need up to 12 V. The external power supply should be connected as follows:

Everything is now ready, you can simply plug the Arduino back into the computer, it should power up and unlock the battery. If you want to see this process in action, you can open the serial monitor in Arduino and you will see updates as the program runs to unlock the battery.

Once completed, you should immediately start charging your battery until it is 100% full.
Although I’m very much against the use of software to lock perfectly fine hardware, such as healthy batteries, it is indeed intended to be a safety feature. It isn’t safe to let certain batteries drop below a critical voltage, it can cause them to swell and even explode. If your battery pack shows any kind of swelling then it is not safe to use and should be properly disposed of.
Once you have unlocked and charged the battery, I suggest to do some short test flights so you can be sure the battery is behaving as expected!
Overall, I hope you found this post useful and if you checkout my YouTube video you can perform the fix in real time with me!