Physical Address
304 North Cardinal St.
Dorchester Center, MA 02124
Physical Address
304 North Cardinal St.
Dorchester Center, MA 02124
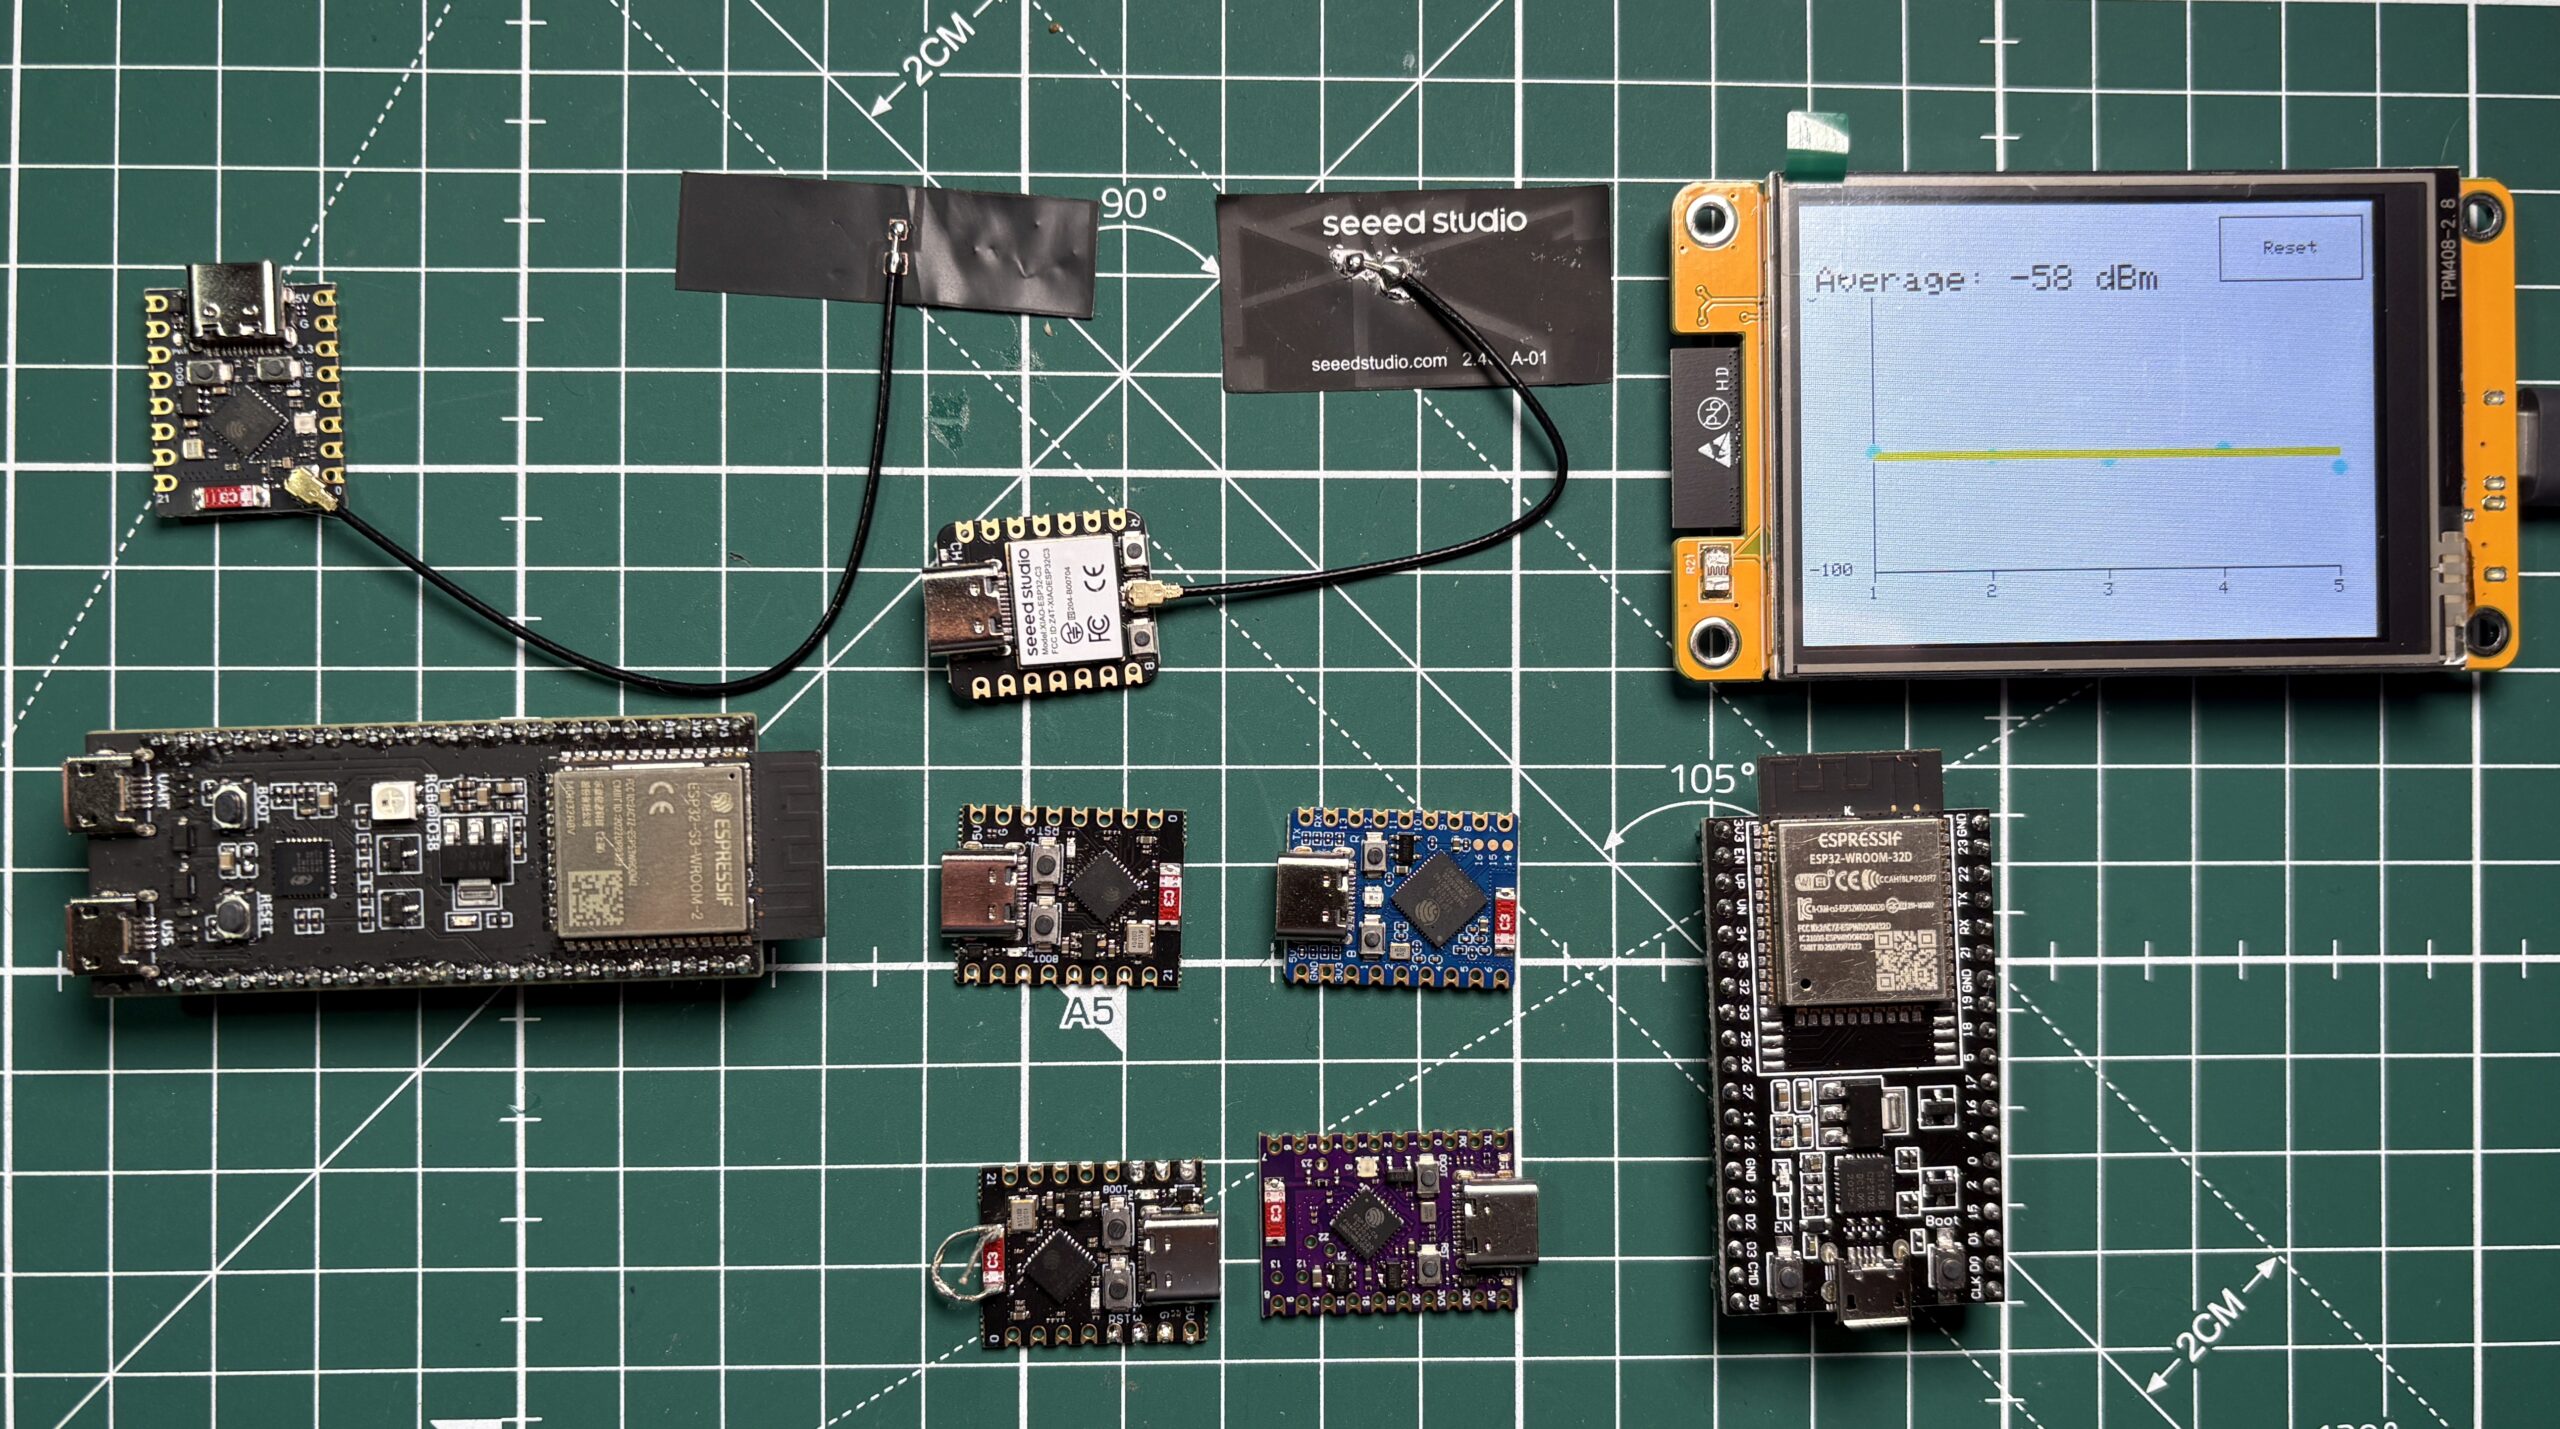
In a recent YouTube video I looked at how to improve the WIFI performance of cheap ESP32 C3 mini development boards from Ali Express and the results were really impressive, easily tripling the WIFI range with minimal effort. But what was even more impressive was the response to that video, with some really excellent feedback, insight and questions being put in the comments! I really appreciate this and this post and linked video are my attempt to answer some of those questions (because there were too many to answer directly) …
My aim is to give a definitive answer to the question of which ESP32 development board offers the best performance for wireless connectivity. I’ve gathered together several popular ESP32 development boards, some are ‘official’ products while others are ‘clones’ from Ali Express. I perform three tests to assess the performance, these all involve setting the ESP32 under test as a wireless access point and using a client to record the relative signal strength (in dBm) from the access point.
As described above, it is necessary to have the ‘device under test’ act as an access point (AP), either for WiFi or Bluetooth. The code you need to upload in Arduino IDE to create a WiFi AP is as follows:
#include <WiFi.h>
extern "C" {
  #include "esp_wifi.h"
}

const char* ssid     = "ESP32_AP";
const char* password = "12345678"; // at least 8 chars

void setup() {
  Serial.begin(115200);
  delay(500);

  Serial.println("Setting up access point...");
  WiFi.mode(WIFI_AP);
  // — set channel 2 to avoid congested 1, 6, 11 —
  WiFi.softAP(ssid, password, 2);

  Serial.print("AP IP address: ");
  Serial.println(WiFi.softAPIP());
  Serial.print("AP channel: ");
  Serial.println(WiFi.channel());
  Serial.println();
}

void loop() {
  // 1) Get list of connected stations
  wifi_sta_list_t stationList;
  esp_err_t err = esp_wifi_ap_get_sta_list(&stationList);
  if (err != ESP_OK) {
    Serial.printf("Failed to get station list (err=%d)\n", err);
    delay(2000);
    return;
  }

  // 2) Report count
  if (stationList.num == 0) {
    Serial.println("No clients connected.");
  } else {
    Serial.printf("Clients connected: %d\n", stationList.num);
    // 3) Loop through each entry
    for (int i = 0; i < stationList.num; i++) {
      wifi_sta_info_t& station = stationList.sta[i];
      // Build human-readable MAC string
      char macStr[18];
      snprintf(macStr, sizeof(macStr),
               "%02X:%02X:%02X:%02X:%02X:%02X",
               station.mac[0], station.mac[1], station.mac[2],
               station.mac[3], station.mac[4], station.mac[5]);
      // station.rssi is an int8_t giving dBm
      Serial.printf("  Client %d — MAC: %s, RSSI: %d dBm\n",
                    i + 1, macStr, station.rssi);
    }
  }

  Serial.println();
  delay(2000);
}
The code required to create a Bluetooth AP is a little more involved:
#include <BLEDevice.h>
#include <BLEServer.h>
#include <BLEUtils.h>
#include <BLE2902.h>

// — change these UUIDs if you like —
#define SERVICE_UUID        "4fafc201-1fb5-459e-8fcc-c5c9c331914b"
#define CHARACTERISTIC_UUID "beb5483e-36e1-4688-b7f5-ea07361b26a8"

void setup() {
  Serial.begin(115200);

  // 1) Initialize BLE with the device name "ESP32_AP"
  BLEDevice::init("ESP32_AP");

  // 2) Create the BLE Server
  BLEServer *pServer = BLEDevice::createServer();

  // 3) Create a service
  BLEService *pService = pServer->createService(SERVICE_UUID);

  // 4) Create a characteristic on that service
  BLECharacteristic *pCharacteristic = pService->createCharacteristic(
                                         CHARACTERISTIC_UUID,
                                         BLECharacteristic::PROPERTY_READ   |
                                         BLECharacteristic::PROPERTY_NOTIFY
                                       );
  // Set an initial value
  pCharacteristic->setValue("Hello from ESP32_AP");

  // 5) Start the service
  pService->start();

  // 6) Start advertising
  BLEAdvertising *pAdvertising = BLEDevice::getAdvertising();
  // Include our service UUID so scanners can filter on it
  pAdvertising->addServiceUUID(SERVICE_UUID);
  // Ensure the device name is included in advertising packets
  pAdvertising->setScanResponse(true);

  BLEDevice::startAdvertising();
  Serial.println("BLE Peripheral advertising as \"ESP32_AP\"");
}

void loop() {
  // Nothing else to do: we’re just advertising.
  //   pCharacteristic->setValue(...);
  //   pCharacteristic->notify();
  delay(1000);
}
With an access point successfully created it is necessary to establish an appropriate client, as described in the video, I used a ‘Cheap Yellow Display‘ sometimes known as a CYD. These are low cost ESP32 WROOM modules with a pretty decent touch screen. To get the display working, I followed a tutorial provided by Random Nerd which worked well but fair warning, it’s a little more involved than simply uploading code to the microprocessor! Once you have followed the Random Nerd guide and shown the screen to work with the example code given in their tutorial, you can upload the following code to measure the RSSI five times, plot the results on a graph and calculate the average, again you’ll need separate versions of the code for WiFi and Bluetooth:
WiFi client:
#include <WiFi.h>
#include <TFT_eSPI.h>
#include <XPT2046_Touchscreen.h>
#include <SPI.h>

// — TFT & Touchscreen instances —
TFT_eSPI tft = TFT_eSPI();
#define TOUCH_CS   33
#define TOUCH_IRQ  36
#define TS_MOSI    32
#define TS_MISO    39
#define TS_CLK     25
SPIClass tsSPI = SPIClass(VSPI);
XPT2046_Touchscreen ts(TOUCH_CS, TOUCH_IRQ);

// — Wi-Fi AP credentials —
const char* SSID     = "ESP32_AP";
const char* PASSWORD = "12345678";

// — Measurement settings —
const int SCANS = 5;
int   rssiReadings[SCANS];

// — Graph geometry & header —
const int xOrigin      = 40;
const int yOrigin      = 200;
const int GRAPH_WIDTH  = 260;
const int GRAPH_HEIGHT = 150;
const int RSSI_MIN     = -100;
const int RSSI_MAX     =    0;

const int HEADER_HEIGHT = 50;
const int STATUS_Y      = 33;

// — Reset button in header —
const int BTN_W = 80;
const int BTN_H = 36;
const int BTN_X = 320 - BTN_W - 5;
const int BTN_Y = 7;

// — Color variables (computed in setup) —
uint16_t pointColor;
uint16_t avgLineColor;
uint16_t xColor;

void setup() {
  Serial.begin(115200);

  // init touchscreen
  tsSPI.begin(TS_CLK, TS_MISO, TS_MOSI, TOUCH_CS);
  ts.begin(tsSPI);
  ts.setRotation(1);

  // init display
  tft.init();
  tft.setSwapBytes(true);       // keep this if your panel still needs it
  tft.setRotation(1);           // landscape
  tft.fillScreen(TFT_BLACK);
  tft.setTextColor(TFT_WHITE, TFT_BLACK);

  // compute exact colors
  pointColor   = tft.color565(  0,   0, 255); // pure blue
  avgLineColor = tft.color565(255,   0,   0); // pure red
  xColor        = tft.color565(255,   0,   0); // pure red for X

  // draw static axes
  drawAxes();

  // splash
  showStatus("RSSI Scanner");
  delay(1500);

  // prep Wi-Fi
  WiFi.mode(WIFI_STA);
  WiFi.disconnect(true);
}

void loop() {
  runMeasurement();
}

void runMeasurement() {
  // full clear + axes
  tft.fillScreen(TFT_BLACK);
  drawAxes();
  WiFi.disconnect(true);
  for (int i = 0; i < SCANS; i++) rssiReadings[i] = RSSI_MIN;

  for (int i = 0; i < SCANS; i++) {
    if (checkReset()) return;
    showStatus(String("Test ") + (i+1)); delay(800);

    if (checkReset()) return;
    showStatus("Connecting...");
    WiFi.begin(SSID, PASSWORD);
    unsigned long start = millis();
    while (WiFi.status() != WL_CONNECTED && millis() - start < 5000) {
      if (checkReset()) return;
      delay(100);
    }
    bool ok = WiFi.status() == WL_CONNECTED;

    if (checkReset()) return;
    showStatus(ok ? "Connected" : "Failed"); delay(700);

    int rssi = ok ? WiFi.RSSI() : -50;
    rssiReadings[i] = ok ? rssi : RSSI_MIN;

    if (checkReset()) return;
    showStatus(ok
      ? String("RSSI: ") + rssi + " dBm"
      : "RSSI: fail");
    delay(500);

    WiFi.disconnect(true);
    delay(300);

    int xi = xOrigin + (i * GRAPH_WIDTH) / (SCANS - 1);
    int yi = yOrigin - ((rssi - RSSI_MIN) * GRAPH_HEIGHT) / (RSSI_MAX - RSSI_MIN);

    if (ok) {
      // true blue dot
      tft.fillCircle(xi, yi, 4, pointColor);
    } else {
      // true red X
      tft.drawLine(xi-6, yi-6, xi+6, yi+6, xColor);
      tft.drawLine(xi-6, yi+6, xi+6, yi-6, xColor);
    }
  }

  // compute average
  long sum = 0;  int count = 0;
  for (int v : rssiReadings) {
    if (v != RSSI_MIN) { sum += v; count++; }
  }

  if (checkReset()) return;
  if (count > 0) {
    int avg = sum / count;
    showStatus("Average: " + String(avg) + " dBm");
    int yAvg = yOrigin - ((avg - RSSI_MIN) * GRAPH_HEIGHT) / (RSSI_MAX - RSSI_MIN);
    // bold true red line
    for (int dy = -2; dy <= 2; dy++) {
      tft.drawLine(xOrigin, yAvg + dy, xOrigin + GRAPH_WIDTH, yAvg + dy, avgLineColor);
    }
  } else {
    showStatus("No valid scans");
  }

  // wait for Reset
  while (!checkReset()) delay(100);
}

void drawAxes() {
  tft.drawLine(xOrigin, yOrigin, xOrigin + GRAPH_WIDTH, yOrigin, TFT_WHITE);
  tft.drawLine(xOrigin, yOrigin, xOrigin, yOrigin - GRAPH_HEIGHT, TFT_WHITE);

  tft.setTextSize(1);
  for (int i = 0; i < SCANS; i++) {
    int xi = xOrigin + (i * GRAPH_WIDTH) / (SCANS - 1);
    tft.drawLine(xi, yOrigin, xi, yOrigin + 5, TFT_WHITE);
    tft.setCursor(xi - 3, yOrigin + 8);
    tft.print(i + 1);
  }

  tft.setCursor(5, yOrigin - GRAPH_HEIGHT - 5); tft.print(RSSI_MAX);
  tft.setCursor(5, yOrigin - 5);               tft.print(RSSI_MIN);

  tft.setTextSize(2);
  tft.setCursor(10, yOrigin - GRAPH_HEIGHT - 25);
  tft.print("RSSI Graph");
}

void showStatus(const String &msg) {
  tft.fillRect(0, 0, tft.width(), HEADER_HEIGHT, TFT_BLACK);
  // Reset button
  tft.drawRect(BTN_X, BTN_Y, BTN_W, BTN_H, TFT_WHITE);
  tft.setTextSize(1);
  int tx = BTN_X + (BTN_W - 5 * 6) / 2;
  int ty = BTN_Y + (BTN_H - 8) / 2;
  tft.setCursor(tx, ty);
  tft.print("Reset");
  // status text
  tft.setTextSize(2);
  tft.setCursor(10, STATUS_Y);
  tft.print(msg);
}

bool checkReset() {
  if (ts.tirqTouched() && ts.touched()) {
    TS_Point p = ts.getPoint();
    int tx = map(p.x, 200, 3700, 0, tft.width());
    int ty = map(p.y, 240, 3800, 0, tft.height());
    if (tx >= BTN_X && tx <= BTN_X + BTN_W &&
        ty >= BTN_Y && ty <= BTN_Y + BTN_H) {
      while (ts.touched()) delay(5);
      return true;
    }
  }
  return false;
}
Bluetooth client:
#include <TFT_eSPI.h>
#include <XPT2046_Touchscreen.h>
#include <BLEDevice.h>
#include <BLEScan.h>
#include <BLEAdvertisedDevice.h>
#include <SPI.h>

// — TFT & Touchscreen instances —
TFT_eSPI tft = TFT_eSPI();
#define TOUCH_CS   33
#define TOUCH_IRQ  36
#define TS_MOSI    32
#define TS_MISO    39
#define TS_CLK     25
SPIClass tsSPI = SPIClass(VSPI);
XPT2046_Touchscreen ts(TOUCH_CS, TOUCH_IRQ);

// — BLE scan target —
const char* TARGET_BLE_NAME = "ESP32_AP";

// — BLE scanner handle —
BLEScan* pBLEScan;

// — Measurement settings —
const int SCANS = 5;
int   rssiReadings[SCANS];

// — Graph & header geometry —
const int xOrigin      = 40;
const int yOrigin      = 200;
const int GRAPH_WIDTH  = 260;
const int GRAPH_HEIGHT = 150;
const int RSSI_MIN     = -100;
const int RSSI_MAX     =    0;

const int HEADER_HEIGHT = 50;
const int STATUS_Y      = 33;

// — Reset button in header —
const int BTN_W = 80;
const int BTN_H = 36;
const int BTN_X = 320 - BTN_W - 5;
const int BTN_Y = 7;

// — Colors (with TFT_RGB_ORDER TFT_BGR in User_Setup.h) —
uint16_t pointColor   = TFT_BLUE;  // pure blue dots
uint16_t avgLineColor = TFT_RED;   // pure red average line
uint16_t xColor        = TFT_RED;  // pure red X on failures

void setup() {
  Serial.begin(115200);

  // — init touchscreen over VSPI —
  tsSPI.begin(TS_CLK, TS_MISO, TS_MOSI, TOUCH_CS);
  ts.begin(tsSPI);
  ts.setRotation(1);

  // — init TFT display —
  tft.init();
  tft.setSwapBytes(true);         // ensure correct byte order
  tft.setRotation(1);             // landscape 320×240
  tft.fillScreen(TFT_BLACK);
  tft.setTextColor(TFT_WHITE, TFT_BLACK);

  // — draw graph axes once —
  drawAxes();

  // — initial splash —
  showStatus("BLE RSSI Scan");
  delay(1500);

  // — init BLE scanner —
  BLEDevice::init("");
  pBLEScan = BLEDevice::getScan();
  pBLEScan->setActiveScan(true);
  pBLEScan->setInterval(100);
  pBLEScan->setWindow(99);
}

void loop() {
  runMeasurement();
}

// — perform one 5-scan session; returns if Reset tapped —
void runMeasurement() {
  // clear and redraw axes
  tft.fillScreen(TFT_BLACK);
  drawAxes();

  // reset readings
  for (int i = 0; i < SCANS; i++) rssiReadings[i] = RSSI_MIN;

  // 5 BLE scans
  for (int i = 0; i < SCANS; i++) {
    if (checkReset()) return;
    showStatus(String("Scan ") + (i+1) + "/" + SCANS);
    delay(800);

    // start a 3s scan, returns a pointer
    BLEScanResults* results = pBLEScan->start(3, false);
    int rssi = RSSI_MIN;
    bool found = false;

    // iterate over results
    int count = results->getCount();
    for (int j = 0; j < count; j++) {
      BLEAdvertisedDevice dev = results->getDevice(j);
      if (dev.getName() == TARGET_BLE_NAME) {
        rssi = dev.getRSSI();
        found = true;
        break;
      }
    }
    pBLEScan->clearResults();  // free memory

    // show and plot
    if (!found) {
      showStatus("Not found");
      // red X at –50 dBm
      int xi = xOrigin + (i * GRAPH_WIDTH) / (SCANS - 1);
      int yi = yOrigin - ((-50 - RSSI_MIN) * GRAPH_HEIGHT) / (RSSI_MAX - RSSI_MIN);
      tft.drawLine(xi-6, yi-6, xi+6, yi+6, xColor);
      tft.drawLine(xi-6, yi+6, xi+6, yi-6, xColor);
      delay(1000);
      continue;
    }

    rssiReadings[i] = rssi;
    showStatus(String("RSSI: ") + rssi + " dBm");
    delay(500);

    // blue dot
    int xi = xOrigin + (i * GRAPH_WIDTH) / (SCANS - 1);
    int yi = yOrigin - ((rssi - RSSI_MIN) * GRAPH_HEIGHT) / (RSSI_MAX - RSSI_MIN);
    tft.fillCircle(xi, yi, 4, pointColor);
  }

  // compute average of valid readings
  long sum = 0;  int countValid = 0;
  for (int v : rssiReadings) {
    if (v != RSSI_MIN) { sum += v; countValid++; }
  }

  if (checkReset()) return;
  if (countValid > 0) {
    int avg = sum / countValid;
    showStatus(String("Avg: ") + avg + " dBm");
    // bold red average line (5px thick)
    int yAvg = yOrigin - ((avg - RSSI_MIN) * GRAPH_HEIGHT) / (RSSI_MAX - RSSI_MIN);
    for (int dy = -2; dy <= 2; dy++) {
      tft.drawLine(xOrigin, yAvg + dy, xOrigin + GRAPH_WIDTH, yAvg + dy, avgLineColor);
    }
  } else {
    showStatus("No valid scans");
  }

  // wait for Reset
  while (!checkReset()) {
    delay(100);
  }
}

// — draw the graph axes & labels —
void drawAxes() {
  tft.drawLine(xOrigin, yOrigin, xOrigin + GRAPH_WIDTH, yOrigin, TFT_WHITE);
  tft.drawLine(xOrigin, yOrigin, xOrigin, yOrigin - GRAPH_HEIGHT, TFT_WHITE);

  tft.setTextSize(1);
  for (int i = 0; i < SCANS; i++) {
    int xi = xOrigin + (i * GRAPH_WIDTH) / (SCANS - 1);
    tft.drawLine(xi, yOrigin, xi, yOrigin + 5, TFT_WHITE);
    tft.setCursor(xi - 3, yOrigin + 8);
    tft.print(i + 1);
  }

  tft.setCursor(5, yOrigin - GRAPH_HEIGHT - 5);
  tft.print(RSSI_MAX);
  tft.setCursor(5, yOrigin - 5);
  tft.print(RSSI_MIN);

  tft.setTextSize(2);
  tft.setCursor(10, yOrigin - GRAPH_HEIGHT - 25);
  tft.print("BLE RSSI");
}

// — draw header + Reset button + status text —
void showStatus(const String &msg) {
  tft.fillRect(0, 0, tft.width(), HEADER_HEIGHT, TFT_BLACK);

  // Reset button
  tft.drawRect(BTN_X, BTN_Y, BTN_W, BTN_H, TFT_WHITE);
  tft.setTextSize(1);
  int tx = BTN_X + (BTN_W - 5 * 6) / 2;  // 5 chars × 6px
  int ty = BTN_Y + (BTN_H - 8) / 2;      // 8px high font
  tft.setCursor(tx, ty);
  tft.print("Reset");

  // status text
  tft.setTextSize(2);
  tft.setCursor(10, STATUS_Y);
  tft.print(msg);
}

// — detect touch inside Reset button —
bool checkReset() {
  if (ts.tirqTouched() && ts.touched()) {
    TS_Point p = ts.getPoint();
    int tx = map(p.x, 200, 3700, 0, tft.width());
    int ty = map(p.y, 240, 3800, 0, tft.height());
    if (tx >= BTN_X && tx <= BTN_X + BTN_W &&
        ty >= BTN_Y && ty <= BTN_Y + BTN_H) {
      while (ts.touched()) delay(5);
      return true;
    }
  }
  return false;
}
With everything installed and the AP activited, you should see the following screen on the CYD:
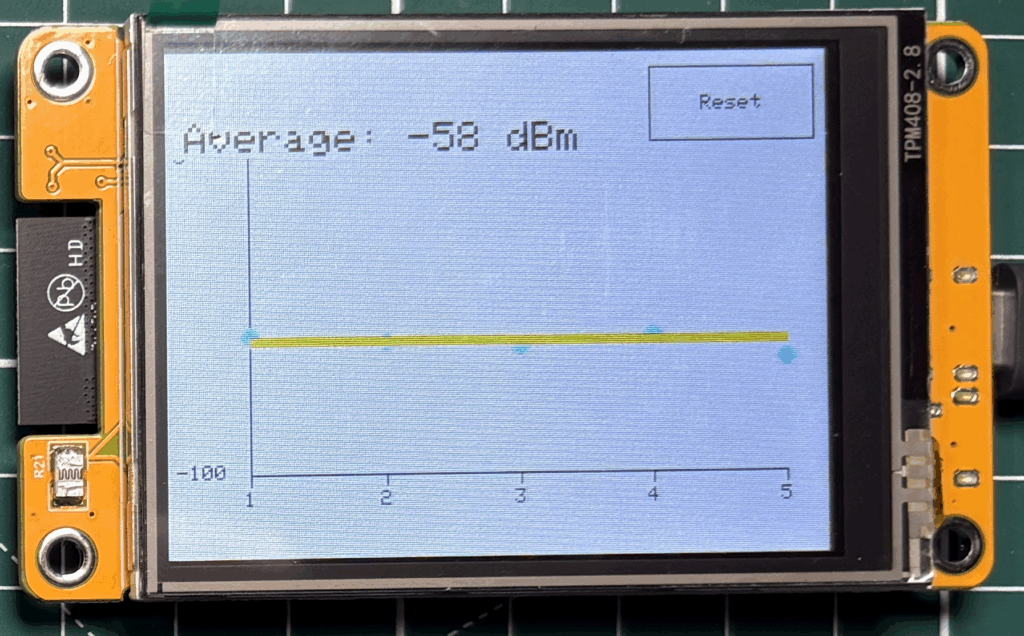
The Y-axis shows the RSSI in dBm and the X-axis is the test number.
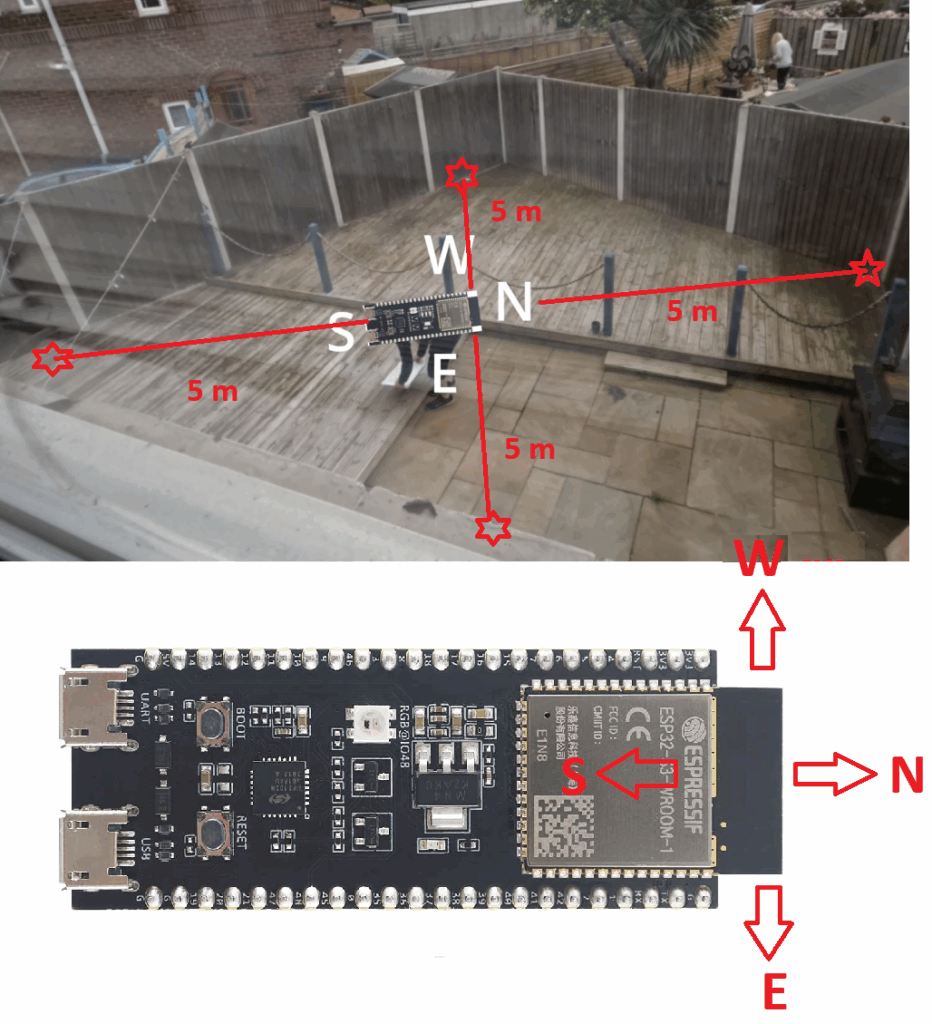
The biggest ’empty’ space I have at my house is my back yard, by placing the AP roughly in the centre I can just about measure four points at 5 m distance, as shown below. I placed the AP on the red bucket with the antenna pointing towards the ‘North’ point as shown in the diagram below. I did this for all ESP32’s tested, making sure I stood in exactly the same position when recording the RSSI in each test.
The average of five RSSI scans at each position for eight development boards was plotted on a ‘spider’ plot (I’m not sure what it’s correct name is!). The first four boards examined include the C6 mini clone, the S3 mini clone, the ubiquitous WROOM32 and the official Espressif ESP32 S3 dev kit :
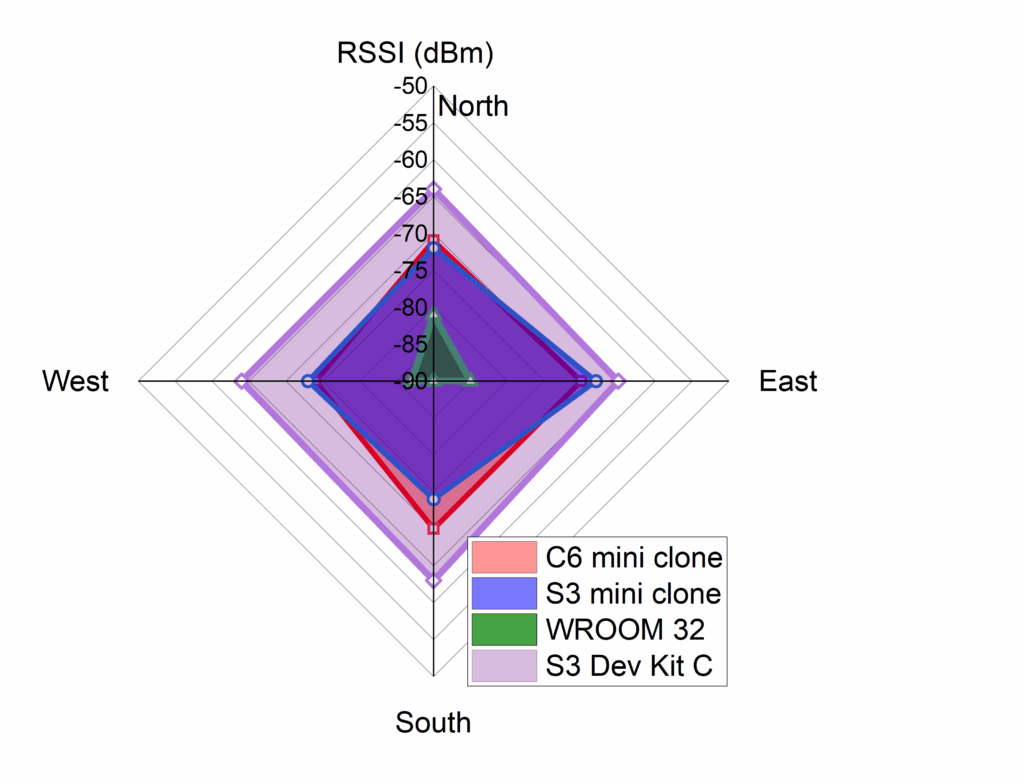
As can be seen, the S3 dev kit is the star of the show here, it has the highest RSSI at all positions meaning the antenna is omnidirectional, something that I consider to be an advantage for most hobby projects where you cannot be sure of the orientation of the ESP when it’s inside an enclosure etc. The two ‘mini’ boards perform reasonably well considering they make use of the ‘C3’ ceramic antenna. The loser is the WROOM 32, I was very surprised to see such poor performance as I have used these development boards in WIFI applications for many years, it might be the case that this particular board was damaged in transit.
The next four boards considered include two with an external antenna, the origianl C3 mini and the ‘hacked’ C3 mini with wire antenna (basically the focus of my previous video):
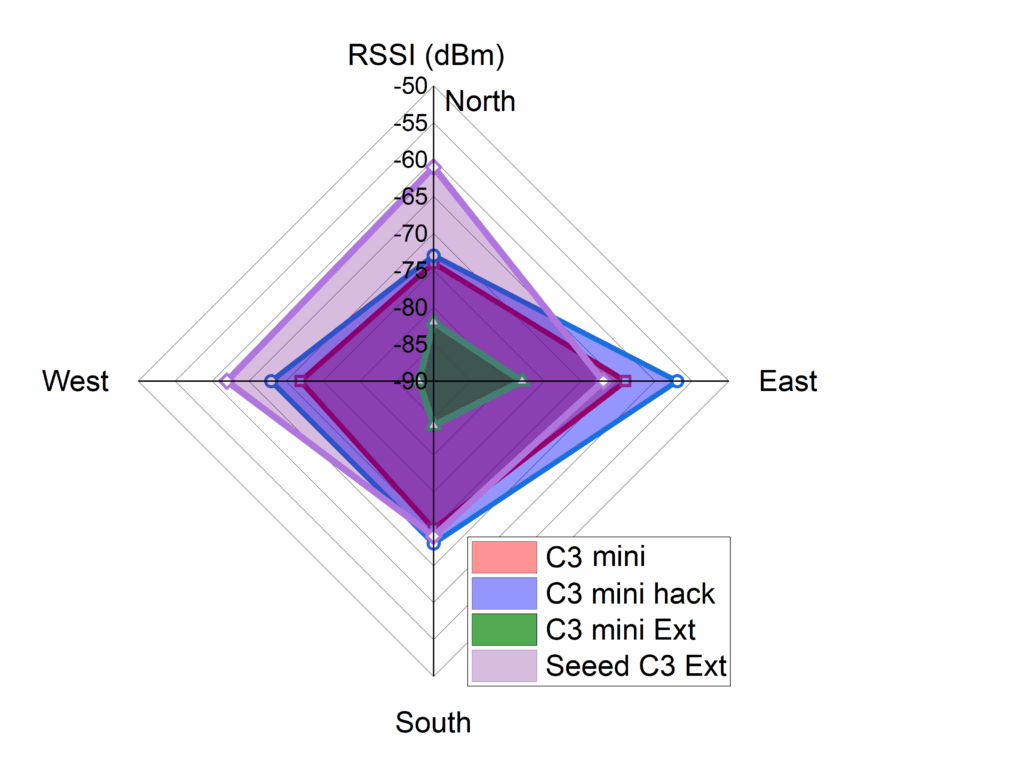
There are a few surprises in this data; firstly, the original ‘C3 mini’ wasn’t THAT bad, at least it didn’t seem to perform much worse than the hacked version with the wire antenna added, with perhaps a few dBm difference in certain directions and an almost 10 dBm improvement to the ‘east’ of the antenna. The real star of the show was the Seeed studio C3 with external antenna, which offered high RSSI and good omnidirectional behaviour. Another surprise was the performance of the C3 mini with an external antenna, whioch was extrmely poor. This board looks like the standard ESP32 C3 mini but includes a connector for an external antenna and comes supplied with a ‘flimsy’ flexible offering (which looks similar to the Seeed antenna at first sight, but differs significantly on closer inspection):
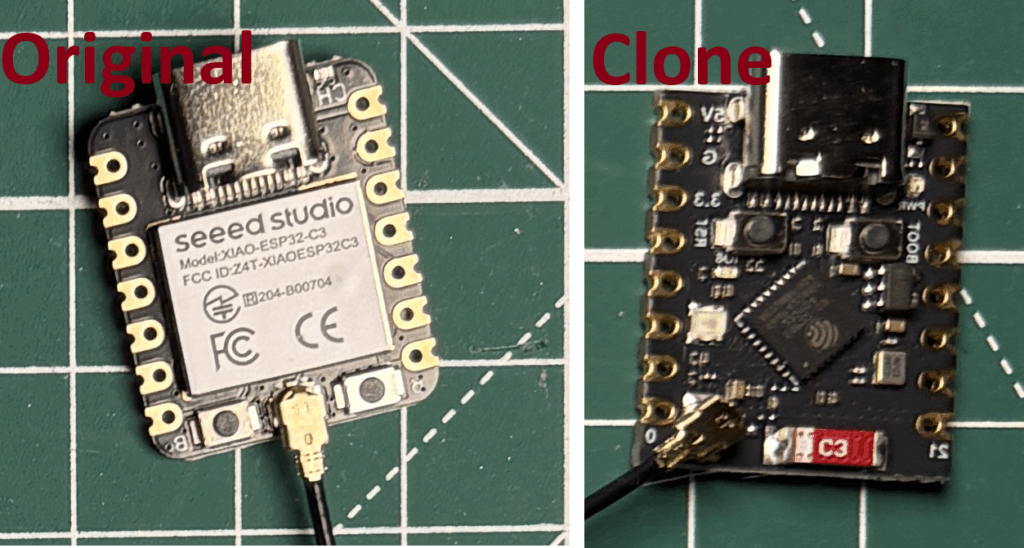
I assume this offering is an attempt at a clone of the Seeed board, but ultimately it was a real disappointment. As can be seen from the plot, the RSSI is very low in all directions to the point that it was struggling to connect in certain positions.
In summary, this test revealed that the official S3 dev kit from Espressif and the Seed Studio dev board are the best performing, which is perhaps not surprising given these were the most expensive boards I tested by quite some margin!
To test the ‘useable’ range of the board I took them to a deserted beach, due to the high surrounding cliffs there was very little interference from other signals, not even mobile phone signals could be received and there were certainly no other WiFi signals in the area. I measured out 20 m markers for the first 100 m (using the gps on my phone) and then 50 m markers up to 300 m. At each position I recorded the average RSSI on the client with each ESP32 dev board acting as the AP.

The range test results approximately follow what was observed in test 1:
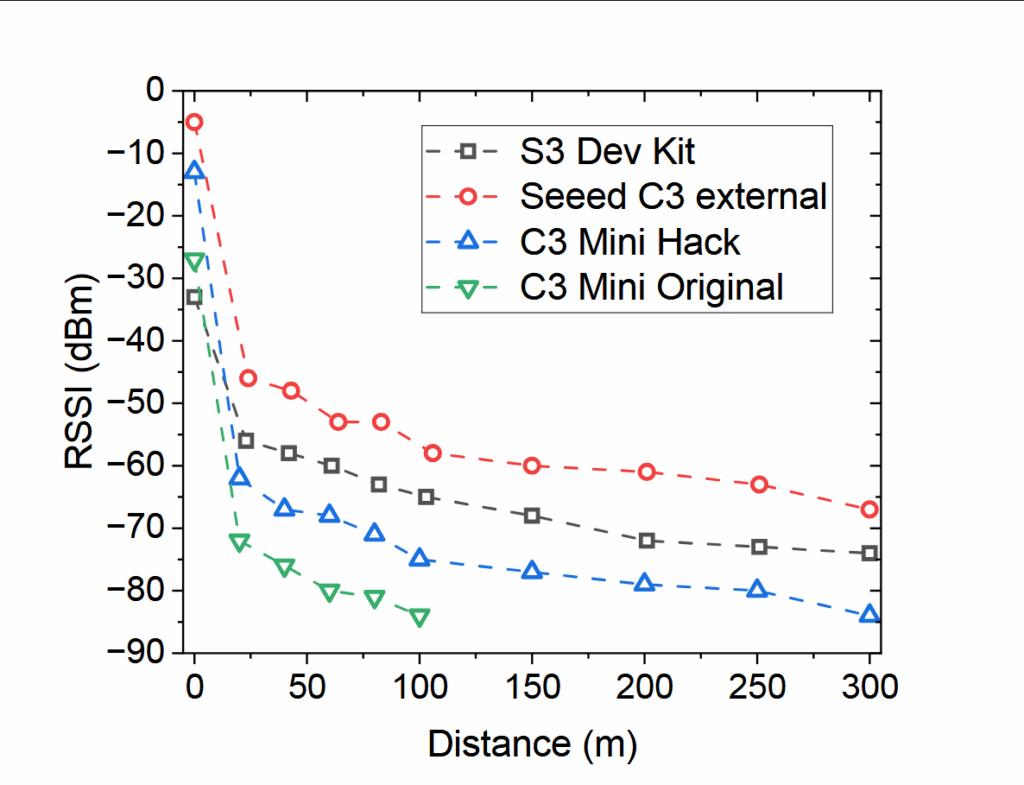
The Seeed board performed extremely well, with a very useable -67 dBm even at 300 m! The S3 dev kit also performed well, dropping to just -69 dBm at 300 m. The ‘hacked’ C3 board with the wire antenna also performed well, with the RSSI only dropping below -80 dBm at 250 m. Interestingly, the unmodified C3 mini was very poor in this test, dropping below -85 dBm after 100 m and failing to connect at greater distances… this result seems to contrast with what was measured in test 1, but aligns well with the findings reported in my first video where I measured ~18 dBm difference in RSSI between the original and modified C3 mini.
Several people asked how implementing the antenna modification suggested by Peter Neufeld would impact Bluetooth connectivity. As WIFI and Bluetooth use the same antenna I assumed that an improvement in WIFI would also translate into an improvement in Bluetooth signal strength, but this was just a hypothesis. To test this, I simply created a Bluetooth access point and modified the client to connect to it and record the RSSI at a distance of 5 m, the results are below:
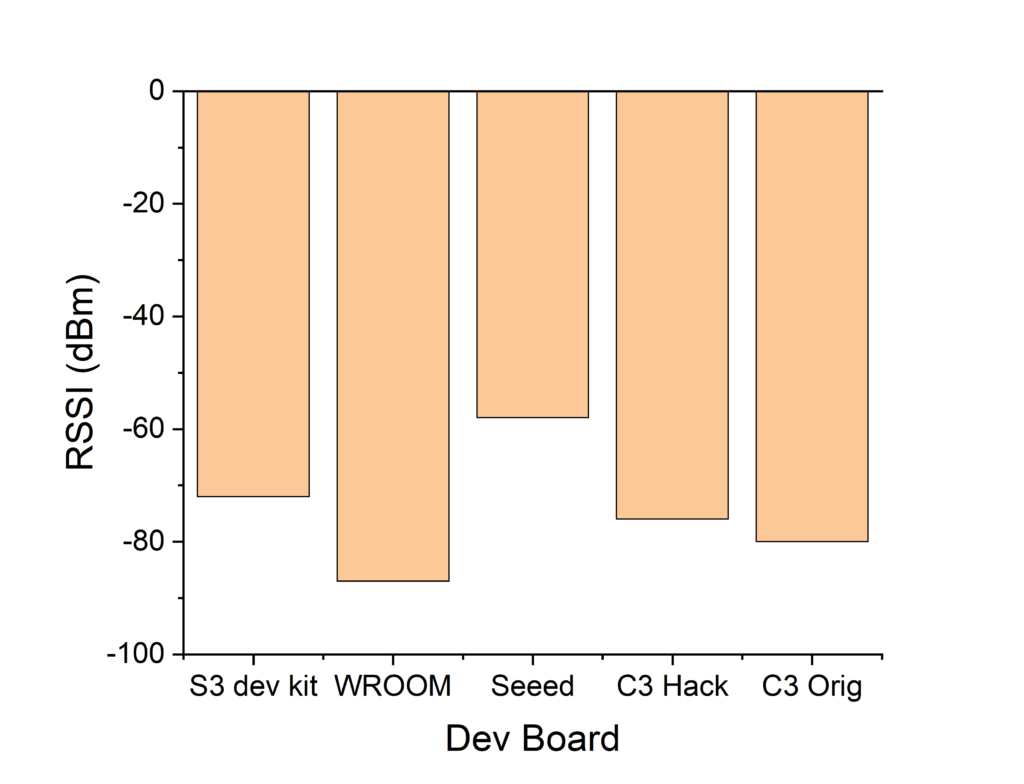
The results do appear to follow the same trend as the WIFI tests, with the Seeed offering the highest RSSI at 5 m and the WROOM module offering the worst performance. It is also clear to see that the addition of a wire antenna to the C3 mini improves Bluetooth performance, by around 5 dBm.
Based on the results it can be seen that the design of the development board has a significant impact on wireless connectivity, with similar microprocessors offering vastly different levels of connectivity performance. Several of the boards tested offered exceptional performance and I don’t think it is a coincidence that these are the more expensive options. I wouldn’t recommend several of the boards tested, especially the C3 mini with external antenna connector, this just didn’t appear to work well at all (although I would like to repeat this test with another board, just to be sure that the one tested was not damaged – the same could be said for the WROOM module). The antenna modification suggested by Peter Neufeld works well to improve the performance of the ubiquitous C3 mini that is so widely available on Ali Express, so these tests confirm that the modification is very much worth doing and is a viable and low cost option!
Here are a few affiliate links for the various boards that I would reccomend based on the tests done:
Tenstar ‘Cheap Yellow Display’, 5*, 490 sold:
https://s.click.aliexpress.com/e/_ol9gcUX
Seeed studio, ESP32 C3, 4.8*, 500+ sold.
https://s.click.aliexpress.com/e/_oC5jrBZ
Seeed studio, ESP32 C6 (new version with Zigbee), 4.9*, 1000+ sold:
https://s.click.aliexpress.com/e/_oDJKBOR
Pick up cheap ESP32 C3 Mini’s from AliExpress and add your own antenna: https://s.click.aliexpress.com/e/_oo2C2Sl
Here’s the link to the ESP32 Zero that has a well-designed antenna: https://s.click.aliexpress.com/e/_ooeF6m9
If you need more compute power, here’s a link to the dual core ESP32 S3 {which also has solid WiFi}: https://s.click.aliexpress.com/e/_oC7RuU1